Fun applications!
Now that the basics of building and configuring an image it is time to apply it to some projects. The first application will be a “switch” that can be used for network debugging. The second application is a private access point that will secure an otherwise insecure wireless network.
Debug Switch

One cool thing about OpenWRT is that it not only makes configuring hard network things easy, it is also extensive enough to include advanced debugging tools. This application is a software based switch. It uses a Jetway x86 based board with 8 built in Ethernet ports. The ports are bridged together so that as far as devices connected to the Ethernet are concerned it is an ordinary switch.
From this platform captures can be performed to visualize network traffic at a packet level. Network load metrics can also be viweed from the LuCI web interface.
Image Configuration
1 2 3 | CONFIG_PACKAGE_luci-app-vnstat=y
CONFIG_PACKAGE_tcpdump=y
CONFIG_PACKAGE_kmod-igb=y
|
Most of the configuration that is needed for this application is already included in the base configuration template from earlier. The key things to add are the debugging and visualization tools for making the switch useful.
Line 1 adds a web interface for the utility vnstat. This tool will help
an administrator to see traffic statistics for the switch.
The second line adds the popular packet dumping tool tcpdump.
The last line is needed to add support for the 8 port Ethernet controller.
Device Configuration
1 2 3 4 | config interface lan
option type 'bridge'
option ifname 'eth0 eth1 eth2 eth3 eth4 eth5 eth6 eth7 eth8'
option proto 'dhcp'
|
The actual configuration is quite minimal. Only network file needs to be changed. In this case to emulate a switch a bridge is created of all of the physical interfaces. While not as efficient as a real switch the x86 CPU is more than capable of managing the traffic.
Putting it Together
$ ssh root@HOST tcpdump -U -s0 -w - 'not port 22' wireshark -k -i -
Being able to capture remote traffic at a switch level is a big help when dealing
with strange network errors. Normally in a unmanaged switch there is no insight into
the entire network’s traffic. Since the “switch” here is actually a bridge
network interface tcpdump can be run directly on that interface. Then
the output can be piped over a SSH connection to a client running wireshark.
One thing to be aware of is that port 22 traffic should be filtered to keep
tcpdump from capturing the packets its sending to the client. Different
filters can be applied depending on what the user is looking for and how much
bandwidth that should be captured. Once the packets are in wireshark there is
a slick user interface that will give insight into the local network.
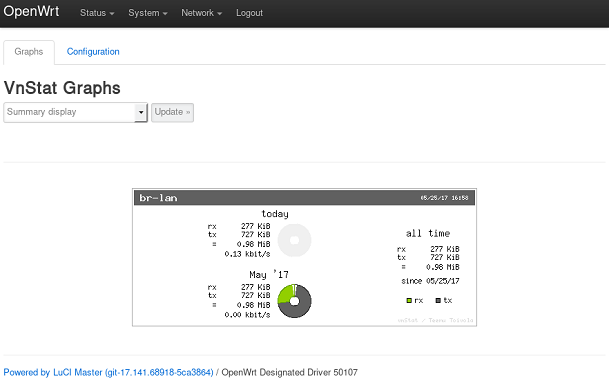
One other useful feature of this “switch” is that network traffic can be
monitored and metrics gathered. A nice tool for OpenWRT is called vnstat.
This tool will generate graphs of various network metrics over time. This
can help identify top consumers of network resources or just generate
pretty graphs to look at.
Private Access Point
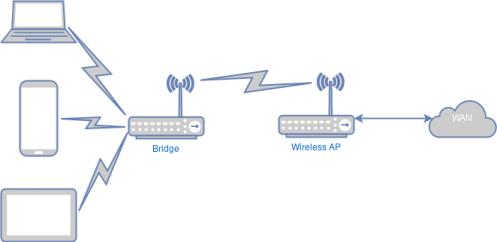
This will allow the AP to act as secure link to a remote SSH server that is considered safe and expose it as a local SOCKS5 proxy. This provides two features: The first is adding security to an otherwise insecure wireless network. The second is adding the ability to get around any local firewalls that might be limiting access to specific sites.
Image Configuration
1 2 3 | ...
CONFIG_PACKAGE_openssh-client=y
CONFIG_PACKAGE_sshtunnel=y
|
For this application the basic template .config file is extended to
add SSH and sshtunnel. The sshtunnel package is a set of shell script
provided by OpenWrt to automate setting up SSH tunnels from UCI. It depends on
the full OpenSSH client so that needs to be added to the application
configuration.
Radio Configuration
1 2 3 4 5 | config wifi-device 'radio0'
option type 'mac80211'
option hwmode '11g'
option htmode 'HT20'
option country 'US'
|
After the configuration is created there are some default settings that should be baked into the image. This will cause the router to come up in enough of a default state that the remainder can be configured at run time.
In the /etc/config/wireless configuration file the radio should be
defined in a way compatible with the desired devices. In this case line 3
is going to set the wireless mode into legacy support. Most devices support
2.4Ghz so this is the best. There is also line 5 that defines the country
code for any wireless regulations that need to be enforced. While this line
is optional, it is a nice thing to do.
Access Point Configuration
1 2 3 4 5 6 7 | config wifi-iface
option device 'radio0'
option network 'lan'
option mode 'ap'
option ssid 'OpenWrt'
option encryption 'psk2'
option key 'password'
|
The next section of the /etc/config/wireless is going to be the access
point for the station to connect to.
Line 2 is going to be the radio we defined in the section above.
Line 3 is the network that this access point will be attached to. This
needs to be done here and not in the /etc/config/network configuration file
because wireless interfaces are calculated on the fly.
Uplink Configuration
1 2 3 4 5 6 | config wifi-iface
option device 'radio0'
option mode 'sta'
option encryption 'none'
option ssid 'hotel'
option network 'wan'
|
Once the access point part of the configuration has been done the station section can be added.
Lines 5 and 6 will need to be modified at run time, but the other lines can be configured at build time. You can put some default values in here too. It won’t hurt anything. Since the station and access point share the same radio line 2 needs to be the same as the other sections.
To configure the interface as a station to the wireless network line 3 needs
to be sta.
The last line then needs to be configured to set the network name to be
wan. This will be needed for the firewall to set up forwarding from the
private access point.
LAN Configuration
1 2 3 4 | config interface 'lan'
option proto 'static'
option ipaddr '192.168.1.1'
option netmask '255.255.255.0'
|
The next file that needs to be configured is the /etc/config/network
file. Normally this can be left empty and it will come up with sane defaults.
In this case the configuration will be provisioned at build time. The lan
interface will be the gateway so it needs a fixed address.
Line 2 will set the interface as static and line 3 is the IP address of the router.
The last line is needed to set the netmask. One key thing to notice in the
configuration is that the iface configuration is missing. This is because
it was defined in the wireless configuration. It is important that the
interface name in line 1 is the same as the network option in the
/etc/config/wireless file.
WAN Configuration
1 2 | config interface 'wan'
option proto 'dhcp'
|
The last section needed in the /etc/config/network file is the wan
configuration. In this case the DHCP protocol will be used to configure
the IP address and gateway. It is important again to make sure the interface
name matches the network option for the wifi-iface in the
/etc/config/wireless file.
SSH Tunnel Configuration
1 2 3 4 5 6 7 8 9 10 | config server 'home'
option user 'username'
option hostname 'ssh.remotehost.com'
option IdentityFile '/root/.ssh/id_rsa'
option retrydelay '15'
config tunnelD 'proxy'
option server 'home'
option localaddress '*'
option localport '4055'
|
The last file that needs to be created is the ssh tunnel configuration file,
/etc/config/sshtunnel. This will automate the connection and configuration
of the ssh tunnel. In the configuration file there are two sections. The
first section is the server connection and the second section is the proxy
configuration.
Line 2 is the username for the connection and line 3 is the remote ssh host that will be connected to. Since this is an automated system service it cannot take an interactive password. For this reason public key authentication is used.
Line 4 is the path to the private key. This key will actually be configured at run time in this example.
The line 5 is important because otherwise the service will timeout and not retry again. This value should be something sensible because it may take a few seconds for the wireless client to make a connection to the WAN.
Line 8 is the server configuration for the proxy. In this case the server name on line 1 is used. This gives the advantage of having multiple remote hosts or multiple exposed proxies.
Lines 9 and 10 are related to what the proxy should listen on. In this case the SOCKS5 proxy will listen on port 4055 of all interfaces.
Putting it Together
Once the image has been created and booted the SSH connection needs to be configured. In theory a static key could be baked into the image and copied to the remote server at build time tough. In this example the key is generated at first boot via a SSH connection, or the local console.
Line 1 will run the ssh-keygen command to generate the public and private
ssh keys.
Lines 2 through 4 will copy this generated key to the remote ssh
host. This also has a side effect of adding the remote host to the
known_hosts file.
Line 5 is optional, but will confirm that the connection is working before the service is enabled. The last line will then enable the ssh tunnel to be created at boot time.
1 2 3 4 5 6 | $ ssh-keygen
$ cat /root/.ssh/id_rsa.pub | \
ssh username@ssh.remotehost.com \
'mkdir -p .ssh && cat >> .ssh/authorized_keys'
$ ssh username@ssh.remotehost.com
$ /etc/init.d/sshtunnel enable
|
The last step in configuration is to connect to the access point and then set up the browser proxy to use SOCKS5 on port 4055 of the access point’s static IP address. It is important to remember to add an exception for the 192.168.1.1 address so that the LuCI html5 interface is still accessible.