Building Your First Image
Before you build your first image you should be comfortable with the Linux command line as well as tools like git and make. None the less most of the real work will be done in a text editor, a text user interface or a few specific commands.
Prerequisites
To do the actual build there needs to be a few support tools installed on
the host operating system. The key ones for your host os can be found on the
OpenWRT wiki. To confirm most packages there is a make prereq target that can
be run to verify correct installation of the tools. The key ones that you will
need though to get started are git, a host compiler tool chain and ncurses.
Feeds
$ ./scripts/feeds update -a
$ ./scripts/feeds install -a
Once the environment has been added the next step is to add some applications to the build. This step is optional but in the end is needed to provide extensions.
The key way of adding applications to your image in OpenWRT is using feeds. Feeds are different repositories that organize the different apps. Depending on how simple or complicated you wish to make your image you can add some or all of the feeds. In this example all of the feeds have been added. When maintaining your image you should periodically run the update and install process to ensure you have all of the latest updates to applications.
Configuration
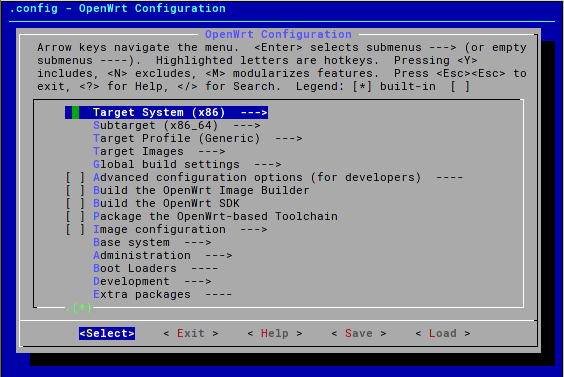
The build system of OpenWRT is descended from buildroot2 so it has a nice
ncurses configuration menu similar to the kernel’s make menuconfig. This
allows a very easy way to configure custom images with all the creature comforts
such as searching and help for each option.
Base Configuration
1 2 3 4 5 6 7 8 9 10 | CONFIG_TARGET_x86=y
CONFIG_TARGET_x86_64=y
CONFIG_TARGET_x86_64_Generic=y
CONFIG_PACKAGE_kmod-usb-hid=y
CONFIG_PACKAGE_kmod-usb2-pci=y
CONFIG_PACKAGE_kmod-usb3=y
CONFIG_PACKAGE_kmod-ath9k=y
CONFIG_ATH9K_SUPPORT_PCOEM=y
CONFIG_PACKAGE_luci-ssl-openssl=y
CONFIG_PACKAGE_wpad=y
|
One advantage of using kconfig is that you can edit configuration fragments
outside of make menuconfig. Here we have a simple configuration template to
base the projects here off of. This configuration will set the target to be a
generic 64bit x86 PC. While OpenWRT supports many different routers for the
sake of hackability I chose to use a simple PC with multiple Intel e1000 NICs
and an Atheros 9k compatible WiFI card.
The lines 1-3 are setting the platform to be a generic x86-64 board.
Lines 4-6 are adding USB and keyboard support. While this is not 100% necessary it is helpful in cases where you are debugging and SSH may not be accessible.
Lines 7-8 are enabling the Atheros wireless card that I am using in this
example. In practice you can put any wireless card in here, but the easiest way
to do this is via the make menuconfig UI.
Line 9 is enabling the web UI. This is optional but it can be easier to tweak things from the web UI during production operations.
Finally line 10 is enabling the wireless access point feature.
This is only a fragment so you would copy this into the .config of your
source directory and run make menuconfig or make defconfig.
Managing Customizations
$ ./scripts/diffconfig > ../test.config
$ cp ../other.config .config
$ make defconfig
$ make
Once the you have configured the image with menuconfig it is good practice
to save your configuration. Since OpenWRT is constantly updating you should
only save your local changes from the default configuration. OpenWRT provides a
tool called diffconfig that will do just that. It will compare your changes to
the configuration defaults and generate a fragment file. This file can then
later be copied into the .config and rehydrated by using the make defconfig
or make menuconfig targets.